ConstraintLayoutレイアウトファイル(XML)制約の書き方。グループ・サイズを制御する属性とパラメーター【Androidアプリ開発】
グループの制約
前回の記事に引き続き、ConstraintLayoutレイアウトファイル(XML)のグループの制約とビューの大きさを制御する制約を書いていきます。
配置パターン別の制約は下記の記事へどうぞ。
ビューをグループ化する
ビューをグループ化するには下記の属性を設定します。
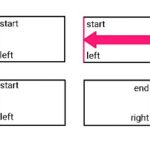
- 子要素のグループの宣言
- id属性にグループ名を記述します。
- constraint_referenced_ids属性でグループ化するビューを指定する。
<androidx.constraintlayout.widget.Group
        android:id="@+id/group"
        android:layout_width="wrap_content"
        android:layout_height="wrap_content"
        app:constraint_referenced_ids="buttonA,buttonB" />
wrap_contentの制限~ビューのサイズを制御する~
ビューの最小サイズと最大サイズを制限して大きさを制御する事ができます。layout_width属性とlayout_height属性をwrap_contentにする必要があります。また最小と最大をセットで記述しないと機能しません。
| android:minWidth | ビューの最小幅を設定する。 |
| android:minHeight | ビューの最小の高さを設定する。 |
| android:maxWidth | ビューの最大幅を設定する。 |
| android:maxHeight | ビューの最大の高さを設定する。 |
| dp、px、sp、pt、in、mm | 基本的にdpを使う。 |
wrap_contentのサイズ制御の設定例
テキストビューをサイズ制御した時の設定例になります。
最大の高さを150dpにした場合、テキストは設定した高さを越えて表示される事はなくなります。(通常、サイズ制限していなければテキストが収まるようにサイズが調整されます。)
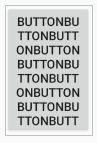
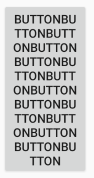
最大の高さを200dpにした場合は下図の様にテキストが収まっています。
    <Button
        android:id="@+id/button1"
        android:layout_width="wrap_content"
        android:layout_height="wrap_content"
        android:maxWidth="100dp"
        android:maxHeight="150dp"
        android:minWidth="100dp"
        android:minHeight="150dp"
   android:text="ButtonButtonButtonButtonButtonButtonButtonButtonButtonButtonButtonButtonButtonButton"
        app:layout_constraintBottom_toBottomOf="parent"
        app:layout_constraintEnd_toEndOf="parent"
        app:layout_constraintHorizontal_bias="0.5"
        app:layout_constraintStart_toStartOf="parent"
        app:layout_constraintTop_toTopOf="parent" />
wrap_contentの制限~ビューをはみ出さない様にする~
layout_width属性・layout_height属性でwrap_contentにした時、ビューのテキストが長かったりすると、ビューがはみ出す、他のビューと重なるなど表示がおかしくなる場合があります。これを幅が収まるようにwrap_contentを制限します。
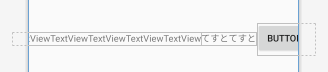
下図は右側のテキストビューの文字列が長すぎて画面からはみ出した例になります。
wrap_contentを制限する属性
はみ出すのを回避する対処方法として、長い文字列の方のテキストビューに下記の属性を[true]にてwrap_contentを制限します。
| app:layout_constrainedWidth | 幅を指定する。 |
| app:layout_constrainedHeight | 高さを指定する。 |
| true | ビューの幅や高さを制限する。 |
| false | ビューの幅や高さを制限しない。デフォルト。 |
[true]にすると下図の様にテキストがはみ出す事もなく画面に全てのビューが収まります。

テキストを制御する属性
2行になるのが好ましくない場合は、テキストの行を制限する属性と長すぎる文字列を[…]で省略する属性でテキストを制御できます。
android:lines="1"
android:ellipsize="end"
wrap_contentを制限する設定例
textView1にwrap_contentとテキストを制御する属性を入れています。
<TextView
        android:id="@+id/textView1"
        android:layout_width="wrap_content"
        android:layout_height="wrap_content"
        android:text="TextViewTextViewTextViewTextViewTextView"
        app:layout_constrainedWidth="true"
        android:lines="1"
        android:ellipsize="end"
        app:layout_constraintBottom_toBottomOf="parent"
        app:layout_constraintEnd_toStartOf="@+id/textView2"
        app:layout_constraintHorizontal_bias="0.5"
        app:layout_constraintStart_toStartOf="parent"
        app:layout_constraintTop_toTopOf="parent" />

    <TextView
        android:id="@+id/textView2"
        android:layout_width="wrap_content"
        android:layout_height="wrap_content"
        android:text="てすとてすと"
        app:layout_constraintBottom_toBottomOf="parent"
        app:layout_constraintEnd_toStartOf="@+id/button2"
        app:layout_constraintHorizontal_bias="0.5"
        app:layout_constraintStart_toEndOf="@+id/textView1"
        app:layout_constraintTop_toTopOf="parent" />

   <Button
        android:id="@+id/button2"
        android:layout_width="wrap_content"
        android:layout_height="wrap_content"
        android:text="Button"
        app:layout_constraintBottom_toBottomOf="parent"
        app:layout_constraintEnd_toEndOf="parent"
        app:layout_constraintHorizontal_bias="0.5"
        app:layout_constraintStart_toEndOf="@+id/textView2"
        app:layout_constraintTop_toTopOf="parent" />
match_constraintの制限~ビューのサイズを制御する~
layout_width属性・layout_height属性を0dp(match_constraint)にしてる場合、ビューは空きスペースの大きさになりますが、これの大きさを制御する事が出来ます。
ビューの最小サイズと最大サイズを設定する
| app:layout_constraintWidth_min | 最小幅を設定する。 |
| app:layout_constraintHeight_min | 最小の高さを設定する。 |
| app:layout_constraintWidth_max | 最大幅を設定する。 |
| app:layout_constraintHeight_max | 最大高さを設定する。 |
| dp、px、sp、pt、in、mm | 基本的にdpを使う。 |
| wrap | 空きスペースに合わせて適度な幅や高さになる。 |
match_constraintのサイズ制御の設定例
最大幅と最大高さを設定しています。layout_width属性・layout_height属性は0dpにします。
<Button
        android:id="@+id/button1"
        android:layout_width="0dp"
        android:layout_height="0dp"
        android:text="Button1"
        app:layout_constraintWidth_max="300dp"
        app:layout_constraintHeight_max="500dp"
        app:layout_constraintBottom_toBottomOf="parent"
        app:layout_constraintEnd_toEndOf="parent"
        app:layout_constraintHorizontal_bias="0.5"
        app:layout_constraintStart_toStartOf="parent"
        app:layout_constraintTop_toTopOf="parent" />
ビューのサイズをパーセンテージで設定する
大きさを親の大きさに対してパーセンテージで指定する事も出来ます。これには下記の属性を設定します。
- パーセント指定したいlayout_width属性、layout_height属性を"0dp"にする。
- デフォルト属性をパーセントにする。
- 幅や高さを指定する。
デフォルト属性をパーセントにする
パーセント指定したい幅や高さを下記の様に設定します。
app:layout_constraintWidth_default="percent"
app:layout_constraintHeight_default="percent"
幅や高さを指定する
| app:layout_constraintWidth_percent | 幅を親のパーセンテージとして設定する。 |
| app:layout_constraintHeight_percent | 高さを親のパーセンテージとして設定する。 |
| 0.0~1.0 | 0.5で50% |
パーセンテージの設定例
<Button
android:id="@+id/button1"
android:layout_width="0dp"
android:layout_height="0dp"
android:text="Button1"
app:layout_constraintWidth_default="percent"
app:layout_constraintWidth_percent="0.5"
app:layout_constraintHeight_percent="0.3"
app:layout_constraintBottom_toBottomOf="parent"
app:layout_constraintEnd_toEndOf="parent"
app:layout_constraintHorizontal_bias="0.5"
app:layout_constraintStart_toStartOf="parent"
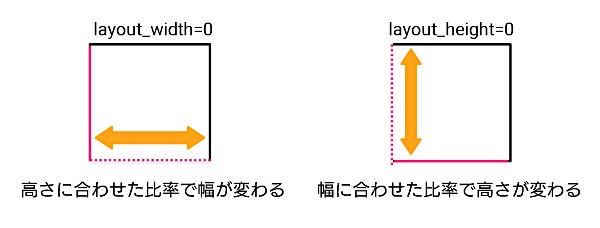
app:layout_constraintTop_toTopOf="parent" />ビューのサイズをアスペクト比で設定する
一辺の長さを基準にしてもう一辺の長さを指定した比率にサイズが合わせられます。これには下記の属性を設定します。
- layout_width属性かlayout_height属性のうち変えたい方を0dpに設定する。
- layout_constraintDimensionRatio属性で比率を設定する。
例えば縦に合わせて幅を変えたい場合はlayout_height属性を0dpに設定します。
layout_constraintDimensionRatio属性
| W, 幅:高さ | 横幅を基準にして縦幅の比率を変更する。 |
| H, 幅:高さ | 縦幅を基準にして横幅の比率を変更する。 |
| 幅:高さ | 幅と高さを:区切りにする。 |
| 幅.高さ | 幅と高さの比率を表す浮動小数点値(float)。 |
app:layout_constraintDimensionRatio比率を[H,16:9]に設定した場合、横のサイズを基準(比率16)にして比率を計算しそれに対して縦のサイズを比率9にします。逆に[W,16:9]にした場合は、縦のサイズを基準(比率9)にして比率を計算しそれに対して横のサイズを比率16にします。
設定例
縦のサイズの比率に合わせて幅を変えています。
    <Button
        android:id="@+id/button1"
        android:layout_width="0dp"
        android:layout_height="wrap_content"
        android:text="Button1"
        app:layout_constraintDimensionRatio="W,16:9"
        app:layout_constraintBottom_toBottomOf="parent"
        app:layout_constraintEnd_toEndOf="parent"
        app:layout_constraintHorizontal_bias="0.5"
        app:layout_constraintStart_toStartOf="parent"
        app:layout_constraintTop_toTopOf="parent" />
wrap_contentは空きスペースに対して適度なサイズに合わせられますが、ビューのサイズを指定したい場合は、layout_height属性をdp単位でサイズ指定します。
画面を表示した時にビューにフォーカスを当てる
画面が最初に起動した時にビューにカーソルを当てておく事ができます。
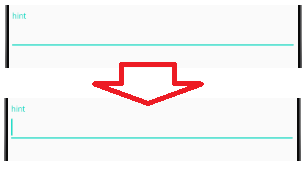
空の<requestFocus>要素を入れ子にします。要素を入れ子にする場合は開始・終了タグの書き方を省略しないように書きます。<要素 ~ />の書き方はダメって事です。この書き方は入れ子に出来ません。
<com.google.android.material.textfield.TextInputLayout
        android:id="@+id/textInputLayout"
        android:layout_width="409dp"
        android:layout_height="wrap_content"
        app:layout_constraintBottom_toBottomOf="parent"
        app:layout_constraintEnd_toEndOf="parent"
        app:layout_constraintHorizontal_bias="0.5"
        app:layout_constraintStart_toStartOf="parent"
        app:layout_constraintTop_toTopOf="parent">

        <com.google.android.material.textfield.TextInputEditText
            android:layout_width="match_parent"
            android:layout_height="match_parent"
            android:hint="hint" />
        <requestFocus/>
    </com.google.android.material.textfield.TextInputLayout>