Android Studioのアプリの背景色、フォントの色やサイズなどのスタイルの設定方法【Androidアプリ】
目次
アプリの見た目を整える
前回の記事で作ったプロジェクトを使って、ビューの色やフォントを変更して体裁を整えていきたいと思います。Android Studioの属性設定方法は動画で紹介しています。
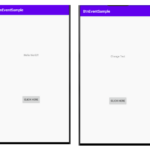
完成したアプリは下図になります。

プロジェクトがない人はGithubのBtnEventSample2もしくは下記のサンプルコードを参考にして下さい。
上記の記事の後に文字列リソースも設定しています。
動画では主に下記の設定をしています。
- レイアウトの背景色を設定
- ビューの文字サイズを設定
- ビューの文字色を設定
- ビューのフォントファミリーを設定
- ビューの文字列を太字に設定
- ビューの文字列を斜体に設定
- ビューの文字列を大文字(小文字)に設定
- ビューの文字列の配置を設定
- ボタンビューの背景色を設定
Android Studioのテキストスタイルの属性
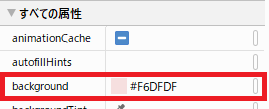
レイアウトの背景色は[background]属性になります。[すべての属性]画面から設定するか、ビューを選択してない状態で[background]属性を[+]ボタンで追加します。
ビューの文字列に関する属性は[共通属性]画面の[textAppearance]を展開すると表示されます。色々いじって見ると良いと思います。

もし、ビューをレイアウト画面から動かした場合はチェーンの制約が解除されてしまう場合があります。その際は再度、ビューを複数選択して、親に水平に制約し、垂直軸のチェーンの設定を行って下さい。
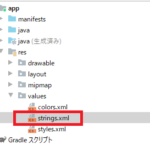
サンプルコード全体
今回はcolors.xmlは設定していません。変更したのはレイアウトファイルのみになります。今回作成したプロジェクトはGithubのBtnEventSample3にも置いてあります
レイアウトファイル(activity_main.xml)
多分下記のコードはコピペするとエラーになると思います。コメント消したら平気かも。
<?xml version="1.0" encoding="utf-8"?>
<androidx.constraintlayout.widget.ConstraintLayout xmlns:android="http://schemas.android.com/apk/res/android"
    xmlns:app="http://schemas.android.com/apk/res-auto"
    xmlns:tools="http://schemas.android.com/tools"
    android:layout_width="match_parent"
    android:layout_height="match_parent"
    android:background="#F6DFDF" <!-- レイアウトの背景色 -->
    tools:context=".MainActivity">

    <TextView
        android:id="@+id/textView1"
        android:layout_width="310dp" <!-- テキスト枠の幅 -->
        android:layout_height="52dp" <!-- テキスト枠の高さ -->
        android:fontFamily="cursive" <!-- フォントファミリー -->
        android:text="@string/txt_before"
        android:textAlignment="center" <!-- テキストの配置 -->
        android:textAllCaps="true" <!-- 英字を大文字(小文字はfalse) -->
        android:textColor="#673AB7" <!-- 文字色 -->
        android:textSize="36sp" <!-- 文字サイズ -->
        android:textStyle="bold|italic" <!-- 太字、斜体 -->
        app:layout_constraintBottom_toTopOf="@+id/button1"
        app:layout_constraintEnd_toEndOf="parent"
        app:layout_constraintHorizontal_bias="0.5"
        app:layout_constraintStart_toStartOf="parent"
        app:layout_constraintTop_toTopOf="parent" />

    <Button
        android:id="@+id/button1"
        android:layout_width="246dp" <!-- テキスト枠の幅 -->
        android:layout_height="55dp" <!-- テキスト枠の高さ -->
        android:background="#E88E8E" <!-- ボタン背景色 -->
        android:fontFamily="casual" <!-- フォントファミリー -->
        android:onClick="btnOnClick"
        android:text="@string/btn_str"
        android:textAlignment="center" <!-- テキスト配置 -->
        android:textAllCaps="true" <!-- 英字を大文字(小文字はfalse) -->
        android:textColor="#FFFFFF" <!-- 文字色 -->
        android:textSize="36sp" <!-- 文字サイズ -->
        android:textStyle="bold|italic" <!-- 太字、斜体 -->
        app:layout_constraintBottom_toBottomOf="parent"
        app:layout_constraintEnd_toEndOf="parent"
        app:layout_constraintHorizontal_bias="0.5"
        app:layout_constraintStart_toStartOf="parent"
        app:layout_constraintTop_toBottomOf="@+id/textView1" />

</androidx.constraintlayout.widget.ConstraintLayout>
MainActivity.kt
package com.example.myapplication

import androidx.appcompat.app.AppCompatActivity
import android.os.Bundle
import android.view.View
import kotlinx.android.synthetic.main.activity_main.*

class MainActivity : AppCompatActivity() {
    override fun onCreate(savedInstanceState: Bundle?) {
        super.onCreate(savedInstanceState)
        setContentView(R.layout.activity_main)
    }

    fun btnOnClick(view: View){
        textView1.text = getString(R.string.txt_after)
    }
}
strings.xml
<resources>
    <string name="app_name">BtnEventSample</string>
    <!-- 追記 -->
    <string name="txt_before">hello world!!</string>
    <string name="btn_str">Click here</string>
    <string name="txt_after">Change Text</string>
</resources>