ConstraintLayoutレイアウトファイル(XML)制約の書き方。配置パターン別の属性とパラメーター【Androidアプリ開発】
ビューの文字列の表示
Androidアプリの主流レイアウトのConstraintLayoutのXMLの書き方を配置パターン別に書いていきます。Android Studioのレイアウトエディタでは出来ない事や細かな調整はXMLで記述します。
XMLの宣言、ルート要素・子要素の説明や必須属性の説明は下記の記事へどうぞ。
ConstraintLayoutの制約の考え方については下記の記事へ。
ビューに表示する文字列の設定
text属性に文字列を設定します。
android:text="文字列"string.xmlでテキストを管理している場合は[@string/]の後に文字列を記述します。
android:text="@string/文字列"相対位置の制約
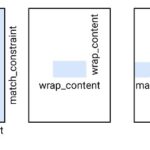
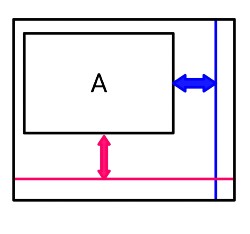
startとleft、endとrightは同じ位置です。単独で使わない限りstart・endの方で書くのが一般的です。
水平・垂直軸共にパラメーターは下記の2つになります。
| parent | 親のレイアウトに対して制約します。 |
| ビューのID | 他のビューに対して制約します。他のビューのIDを指定する。 例) @+id/button1 |
水平軸に制約する
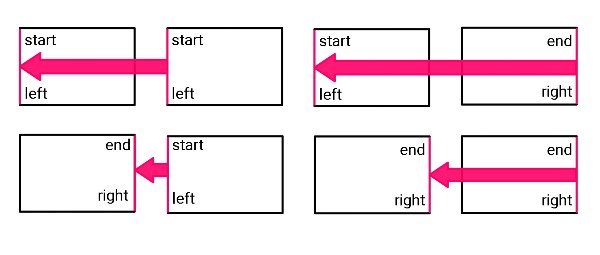
layout_constraintStart_toStartOf
layout_constraintLeft_toLeftOf

layout_constraintStart_toEndOf
layout_constraintLeft_toRightOf

layout_constraintEnd_toStartOf
layout_constraintRight_toLeftOf

layout_constraintEnd_toEndOf
layout_constraintRight_toRightOf
垂直軸に制約する
垂直軸に別名はありません。
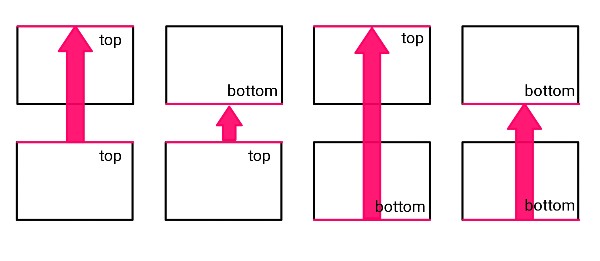
layout_constraintTop_toTopOf
layout_constraintTop_toBottomOf
layout_constraintBottom_toTopOf
layout_constraintBottom_toBottomOf
相対位置の設定例
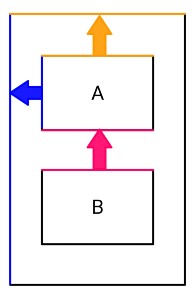
下図のBを制約した場合の設定例です。ボタンAは親に対して制約しています。幅はmargin属性を記述します。
<Button
        android:id="@+id/button-a"
        android:layout_width="wrap_content"
        android:layout_height="wrap_content"
        android:layout_marginStart="80dp"
        android:layout_marginTop="100dp"
        android:text="button-a"
        layout_constraintStart_toEndOf="parent"
        layout_constraintTop_toTopOf="parent" />
<Button
        android:id="@+id/button-b"
        android:layout_width="wrap_content"
        android:layout_height="wrap_content"
        android:layout_marginTop="50dp"
        android:text="button-b"
        layout_constraintTop_toBottomOf="@+id/button-a" />
マージンの制約
幅・高さにマージンを設定します。パラメーターはAndroidが使えるサイズ単位全てが使えると思いますが一般的に[dp]を使います。これもstartとleft、endとrightは同じ位置です。
android:layout_marginStart
android:layout_marginLeft
android:layout_marginEnd
android:layout_marginRight
android:layout_marginTop
android:layout_marginBottom| dp、px、sp、pt、in、mm | 基本的にdpを使う。 |
GONEビューに制約する場合
ビューをGONE(非表示)にした場合はデフォルトではマージン0として扱われます。これを再定義したい場合に設定します。
layout_goneMarginStart
layout_goneMarginLeft
layout_goneMarginEnd
layout_goneMarginRight
layout_goneMarginTop
layout_goneMarginBottom| dp、px、sp、pt、in、mm | 基本的にdpを使う。 |
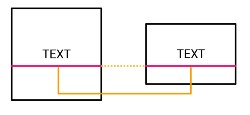
ベースラインで制約する
他のビューのベースラインに対して位置合わせします。パラメーターは他のビューです。
app:layout_constraintBaseline_toBaselineOf| ビューのID | 他のビューのIDを指定する。 例) @+id/button1 |
ベースラインの設定例
下図の様にボタンビューに対してテキストビューを制約した設定例になります。ボタンは親に対して制約をしています。
<Button
        android:id="@+id/button7"
        android:layout_width="124dp"
        android:layout_height="167dp"
        android:text="Button7"
        app:layout_constraintBottom_toBottomOf="parent"
        app:layout_constraintEnd_toEndOf="parent"
        app:layout_constraintHorizontal_bias="0.222"
        app:layout_constraintStart_toStartOf="parent"
        app:layout_constraintTop_toTopOf="parent" />

    <TextView
        android:id="@+id/textView3"
        android:layout_width="114dp"
        android:layout_height="73dp"
        android:layout_marginStart="68dp"
        android:text="ベースライン"
        app:layout_constraintBaseline_toBaselineOf="@+id/button7"
        app:layout_constraintStart_toEndOf="@+id/button7" />
ガイドラインに対して制約する
ガイドラインを使うには下記の属性を含めます。
- 子要素のガイドラインの宣言
- orientation属性で水平軸か垂直軸かを指定する。
- layout_constraintGuide_begin属性かlayout_constraintGuide_end属性かsetGuidelinePercent属性で親コンテナとの幅を指定する。
ガイドラインの宣言
子要素のガイドラインを宣言します。
<androidx.constraintlayout.widget.Guideline>orientation属性
水平軸のガイドラインか垂直軸のガイドラインかを指定します。
android:orientation| horizontal | 水平軸のガイドライン |
| vertical | 垂直軸のガイドライン |
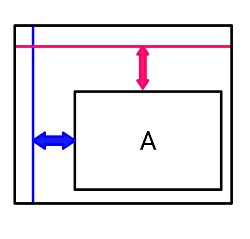
layout_constraintGuide_begin属性
ガイドラインの上または左からの距離を指定します。orientation属性とセットで使用します。horizontalを設定した場合は上→下の垂直の距離、verticalを設定した場合は左→右の水平の距離になります。
app:layout_constraintGuide_begin| dp、px、sp、pt、in、mm | 基本的にdpを使う。 |
layout_constraintGuide_end属性
ガイドラインの下または右からの距離を指定します。orientation属性とセットで使用します。horizontalを設定した場合は下→上の垂直の距離、verticalを設定した場合は右→左の水平の距離になります。
app:layout_constraintGuide_end| dp、px、sp、pt、in、mm | 基本的にdpを使う。 |
setGuidelinePercent属性
距離を%比率で指定したい場合に使います。orientation属性とセットで使用します。
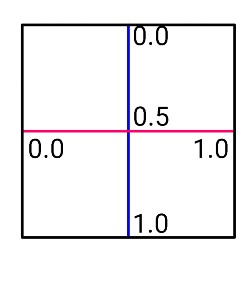
app:setGuidelinePercent| 0.0~1.0 | 0.5で50%(真ん中) |
ガイドラインの設定例
下図の様にボタンビューをガイドラインに対して制約しています。ガイドラインは親に対して制約しています。
   <Button
        android:id="@+id/button11"
        android:layout_width="wrap_content"
        android:layout_height="wrap_content"
        android:layout_marginStart="72dp"
        android:layout_marginTop="148dp"
        android:text="Button"
        app:layout_constraintStart_toStartOf="@id/guideline19"
        app:layout_constraintTop_toTopOf="@id/guideline20" />

    <androidx.constraintlayout.widget.Guideline
        android:id="@+id/guideline19"
        android:layout_width="wrap_content"
        android:layout_height="wrap_content"
        android:orientation="vertical"
        app:layout_constraintEnd_toEndOf="parent"
        app:layout_constraintGuide_begin="88dp"
        app:layout_constraintHorizontal_bias="0.5"
        app:layout_constraintStart_toStartOf="parent" />

    <androidx.constraintlayout.widget.Guideline
        android:id="@+id/guideline20"
        android:layout_width="wrap_content"
        android:layout_height="wrap_content"
        android:orientation="horizontal"
        app:layout_constraintBottom_toBottomOf="parent"
        app:layout_constraintGuide_begin="139dp"
        app:layout_constraintTop_toTopOf="parent" />
バリアに対して制約する
バリアは複数のビューに対して機能します。複数のビューの中で一番長いビューに自動的に合わせられます。バリアを使うには下記の属性を含みます。
- 子要素のバリアの宣言
- barrierDirection属性で位置を指定する。
- constraint_referenced_ids属性でビューを指定する。
バリアの宣言
子要素のバリアを宣言します。
<androidx.constraintlayout.widget.Barrier>barrierDirection属性
バリアの位置を指定します。
app:barrierDirection| start、right、end、left、top、bottom | バリアの位置を指定します。 |
constraint_referenced_ids属性
複数のビューを指定します
app:constraint_referenced_ids| ビューのID名,ビューのID名,… | カンマ[,]区切りで指定します。 |
GONEビューに対するバリア
GONEビューが配置されてる場合にバリアを使うとデフォルト(true)ではそのサイズは考慮されます。考慮されない様に設定するにはfalseを設定します。
app:barrierAllowsGoneWidgets| true | GONEビューのサイズは計算されます。デフォルト値。 |
| false | GONEビューのサイズは0として扱われます。 |
バリアの設定例
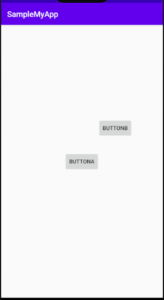
バリアが表示されてるだけの例になります。ButtonAは親に制約し、ButtonBはAと親に制約しています。
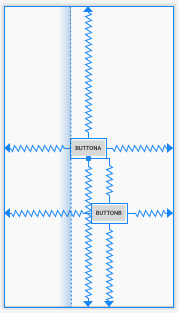
<Button
        android:id="@+id/button1"
        android:layout_width="wrap_content"
        android:layout_height="wrap_content"
        android:text="ButtonA"
        app:layout_constraintBottom_toBottomOf="parent"
        app:layout_constraintEnd_toEndOf="parent"
        app:layout_constraintHorizontal_bias="0.498"
        app:layout_constraintStart_toStartOf="parent"
        app:layout_constraintTop_toTopOf="parent"
        app:layout_constraintVertical_bias="0.471" />

    <Button
        android:id="@+id/button2"
        android:layout_width="wrap_content"
        android:layout_height="wrap_content"
        android:text="ButtonB"
        app:layout_constraintBottom_toBottomOf="parent"
        app:layout_constraintEnd_toEndOf="parent"
        app:layout_constraintHorizontal_bias="0.653"
        app:layout_constraintStart_toStartOf="parent"
        app:layout_constraintTop_toBottomOf="@+id/button1"
        app:layout_constraintVertical_bias="0.351" />

    <androidx.constraintlayout.widget.Barrier
        android:id="@+id/barrier"
        android:layout_width="wrap_content"
        android:layout_height="wrap_content"
        app:barrierDirection="left"
        app:constraint_referenced_ids="button2,button1"
        tools:layout_editor_absoluteX="411dp" />
バイアス・センタリングに制約する
バイアス属性を使ってセンタリングします。数値をずらす事で左右上下どちらかに傾かせる事もできます。バイアスは水平軸・垂直軸があります。
| 0.0~1.0 | %指定。0.5で50%(真ん中) |
app:layout_constraintHorizontal_bias
app:layout_constraintVertical_bias
バイアスの設定例
水平軸・垂直軸にそれぞれ0.5にして画面の真ん中にした例です。

<Button
        android:id="@+id/button2"
        android:layout_width="wrap_content"
        android:layout_height="wrap_content"
        android:text="Button2"
        app:layout_constraintBottom_toBottomOf="parent"
        app:layout_constraintEnd_toEndOf="parent"
        app:layout_constraintHorizontal_bias="0.5"
        app:layout_constraintVertical_bias="0.5"
        app:layout_constraintStart_toStartOf="parent"
        app:layout_constraintTop_toTopOf="parent" />
チェーンの制約
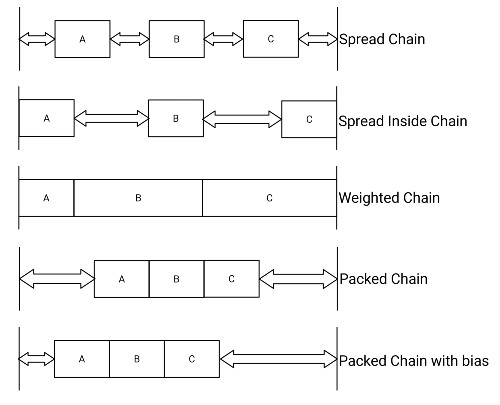
チェーンのスタイルはSpread・Weighted・Packedの3種類あります。チェーンは水平軸・垂直軸に設定できます。
チェーンを作成するには下記の設定をします。
- 各ビューを互いに制約する。
- ヘッドにチェーンスタイルを設定する。
各ビューを互いに制約する
各ビューを互いに制約します。例えばA・B・Cのビューがあった場合で水平軸のチェーンを作りたい場合は下記のようになります。
<Button
        android:id="@+id/button1"
        android:layout_width="wrap_content"
        android:layout_height="wrap_content"
        app:layout_constraintEnd_toStartOf="@+id/button2" />
<Button
        android:id="@+id/button2"
        android:layout_width="wrap_content"
        android:layout_height="wrap_content"
        app:layout_constraintStart_toEndOf="@+id/button1"
        app:layout_constraintEnd_toStartOf="@+id/button3" />
<Button
        android:id="@+id/button3"
        android:layout_width="wrap_content"
        android:layout_height="wrap_content"
        app:layout_constraintStart_toEndOf="@+id/button2" />
ヘッドにチェーンスタイルを設定する
下記の属性をチェーンヘッドに設定します。ヘッドは水平軸なら一番左側のビュー、垂直軸なら一番上のビューになります。
app:layout_constraintHorizontal_chainStyle
app:layout_constraintVertical_chainStyle
スタイルのパラメーターは下記の3種類になります。上の図のWeightedチェーンはspreadのスタイルを指定して、他の属性と組み合わせて作ります。こちらのやり方は後述します。また、Packedチェーンバイアスはbias属性と組み合わせて作ります。こちらも後述。
| spread | spreadチェーンのスタイルを設定します。デフォルト。 |
| spread_inside | spread_insideチェーンのスタイルを設定します。 |
| packed | packedチェーンのスタイルを設定します。 |
チェーンの設定例(spread)
水平軸のspreadチェーンです。水平軸・垂直軸に親コンテナを制約しています。
<Button
        android:id="@+id/button1"
        android:layout_width="wrap_content"
        android:layout_height="wrap_content"
        android:text="ButtonA"
        app:layout_constraintBottom_toBottomOf="parent"
        app:layout_constraintEnd_toStartOf="@+id/button2"
        app:layout_constraintHorizontal_bias="0.5"
        app:layout_constraintHorizontal_chainStyle="spread"
        app:layout_constraintStart_toStartOf="parent"
        app:layout_constraintTop_toTopOf="parent" />

    <Button
        android:id="@+id/button2"
        android:layout_width="wrap_content"
        android:layout_height="wrap_content"
        android:text="ButtonB"
        app:layout_constraintBottom_toBottomOf="parent"
        app:layout_constraintEnd_toEndOf="parent"
        app:layout_constraintHorizontal_bias="0.5"
        app:layout_constraintStart_toEndOf="@+id/button1"
        app:layout_constraintTop_toTopOf="parent" />
Packedチェーンバイアスの設定例
Packedチェーンを作るにはチェーンヘッドに下記の属性を追記します。
- chainStyleをpackedにする。
- layout_constraintHorizontal_bias属性かlayout_constraintVertical_bias属性を設定する。
水平軸のバイアスを設定する場合は下記のようになります。ヘッドビューのみ記載してます。
<Button
        android:id="@+id/button1"
        android:layout_width="wrap_content"
        android:layout_height="wrap_content"
        android:text="ButtonA"
        app:layout_constraintBottom_toBottomOf="parent"
        app:layout_constraintEnd_toStartOf="@+id/button2"
        app:layout_constraintVertical_bias"0.3"
        app:layout_constraintHorizontal_bias="0.5"
        app:layout_constraintHorizontal_chainStyle="packed"
        app:layout_constraintStart_toStartOf="parent"
        app:layout_constraintTop_toTopOf="parent" />
Weightedチェーンの設定例
Weightedチェーンを作るには下記の属性を設定します。
- 各ビューのlayout_width属性かlayout_height属性を0dpに設定する。
- チェーンヘッドのチェーンスタイルをspreadまたはspread insideに設定する。
- 各ビューにlayout_constraintHorizontal_weight属性かlayout_constraintVertical_weight属性で重みを設定する。
重みは例えばAとBのビューがあった場合Aにweight="2″、Bにweight="1″とした時にAはBの2倍の大きさになります。Bが100dpだったらAは200dpといった感じです。
<Button
        android:id="@+id/button1"
        android:layout_width="0dp"
        android:layout_height="wrap_content"
        android:text="ButtonA"
        app:layout_constraintBottom_toBottomOf="parent"
        app:layout_constraintEnd_toStartOf="@+id/button2"
        app:layout_constraintHorizontal_chainStyle="spread"
        app:layout_constraintHorizontal_weight="2"
        app:layout_constraintStart_toStartOf="parent"
        app:layout_constraintTop_toTopOf="parent" />

    <Button
        android:id="@+id/button2"
        android:layout_width="0dp"
        android:layout_height="wrap_content"
        android:text="ButtonB"
        app:layout_constraintHorizontal_weight="1"
        app:layout_constraintBottom_toBottomOf="parent"
        app:layout_constraintEnd_toEndOf="parent"
        app:layout_constraintHorizontal_bias="0.5"
        app:layout_constraintStart_toEndOf="@+id/button1"
        app:layout_constraintTop_toTopOf="parent" />
円形(Circular)配置
ビューを円形上に配置します。円の中心のにあるビューをbuttonAとして他のビューをbuttonBとした場合、buttonBに下記の属性を設定します。
- layout_constraintCircle属性で円の中心のビューを指定する。
- layout_constraintCircleRadius属性で円の中心からの距離を指定する。
- layout_constraintCircleAngle属性で円の角度を指定する。

layout_constraintCircle属性
円の中心にあるビューを指定します。
app:layout_constraintCircle| ビューのID | 円中心のビューのIDを指定する。 例) @+id/buttonA |
layout_constraintCircleRadius属性
円の中心からの距離を指定します。
| dp、px、sp、pt、in、mm | 基本的にdpを使う。 |
app:layout_constraintCircleRadiuslayout_constraintCircleAngle属性
円の角度を指定します。
app:layout_constraintCircleAngle| 0~360 | 角度を数値で指定します。 |
円形(Circular)配置の設定例
円の中心にあるボタンビューAを親に対して制約し、ボタンビューBをAに対して円形配置しています。
    <Button
        android:id="@+id/buttonA"
        android:layout_width="wrap_content"
        android:layout_height="wrap_content"
        android:text="ButtonA"
        app:layout_constraintBottom_toBottomOf="parent"
        app:layout_constraintEnd_toEndOf="parent"
        app:layout_constraintHorizontal_bias="0.5"
        app:layout_constraintVertical_bias="0.5"
        app:layout_constraintStart_toStartOf="parent"
        app:layout_constraintTop_toTopOf="parent" />

    <Button
        android:id="@+id/buttonB"
        android:layout_width="wrap_content"
        android:layout_height="wrap_content"
        android:text="ButtonB"
        app:layout_constraintCircle="@+id/buttonA"
        app:layout_constraintCircleAngle="45"
        app:layout_constraintCircleRadius="120dp"
        tools:ignore="MissingConstraints" />